A Crucial Guide to Diagnosing and Fixing the Source of the Drip
An oil leak is more than just a messy inconvenience—it’s a serious threat to your vehicle’s engine health. Engine oil is the lubricant that keeps moving parts cool and reduces friction, and a significant leak can quickly lead to low oil levels, causing catastrophic engine failure, which is the most expensive repair a vehicle owner can face. Identifying the source of the leak early and taking timely action is vital for preserving your investment and ensuring dependable performance. This article provides a step-by-step guide on how to locate the origin of an oil leak and the common repair solutions.
I. Why Oil Leaks Occur
Oil leaks generally happen due to the deterioration of seals, gaskets, and components designed to contain the oil within the engine. Common causes include:
- Age and Heat: Seals and gaskets are made of rubber, plastic, or cork, which degrade, harden, and crack over time due to constant exposure to high engine heat, which is common in hot climates.
- Over-Torquing: Incorrectly tightening oil drain plugs or filter caps can damage threads or seals, causing leaks.
- Excessive Wear: Components like the oil pan or oil filter housing can suffer damage from road debris or corrosion.
II. Step-by-Step Guide to Identifying the Leak Source
Oil often drips or splashes onto other parts of the engine, making the actual source of the leak difficult to pinpoint. Follow this methodical process:
Step 1: Check the Colour and Location of the Drip
Examine the spot where your car is parked. A small, dark puddle usually indicates an oil leak. Note the general location (front, middle, or rear of the engine bay). Knowing the colour of the fluid can also help distinguish it from other leaks (e.g., red/pink is transmission fluid, green/yellow is coolant).
Step 2: Clean the Engine Thoroughly
You cannot find a fresh leak on a dirty, oily engine. Use an engine degreaser (following instructions carefully) or take the car to a professional mechanic for an engine steam clean. Run the car for a few minutes to ensure the surface is dry.
Step 3: Introduce Dye and Monitor
For hard-to-find leaks, this method is highly effective:
- Add UV Dye: Pour a bottle of UV-detecting dye (available at most auto parts stores) into your engine’s oil filler cap.
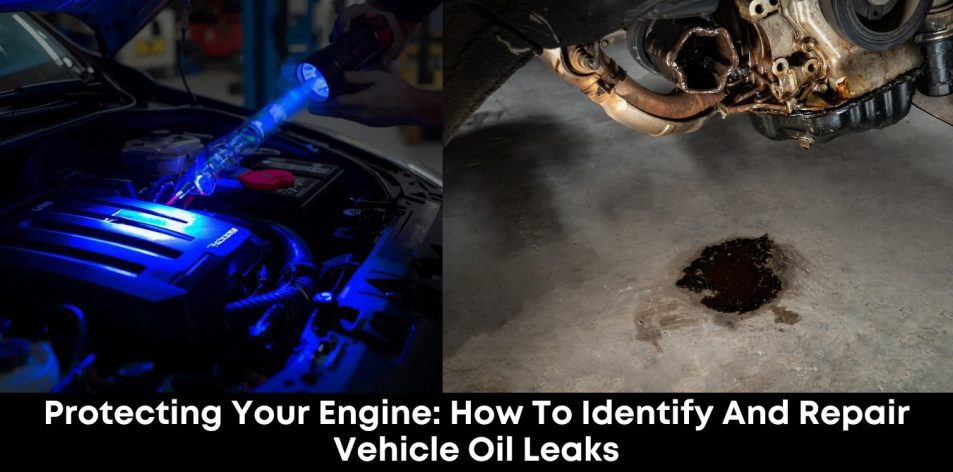
- Drive Briefly: Drive the car for 15–30 minutes to allow the dye to circulate.
- Inspect with UV Light: Park the car and use a UV (black) light to inspect the engine bay. The dye will fluoresce brightly at the exact point of the leak, making the source immediately visible.
Step 4: Check Common Leak Sources First
Once the area is clean, visually inspect the following components, as they are the most frequent culprits:
- Oil Drain Plug: Ensure the plug is tight and the crush washer (gasket) is new or in good condition.
- Oil Filter: Ensure the filter is tight, and the rubber seal is seated correctly.
- Valve Cover Gasket: This is a common leak point, often showing oil residue along the top of the engine block.
- Oil Pan Gasket: Oil residue may be visible around the bottom rim of the oil pan.
- Timing Cover or Seals: Leaks at the very front of the engine near the belts often indicate a problem with the **timing cover gasket** or front main seal.
III. Common Leaks and Repair Solutions
The repair required depends entirely on the component that has failed:
- Oil Drain Plug and Filter: These are the easiest and cheapest fixes, usually requiring only replacement of the crush washer/gasket and ensuring proper tightening.
- Valve Cover Gaskets: A mechanic will remove the valve cover, clean the surfaces, and install a new gasket. This is a common, moderately priced repair.
- Oil Pan Gaskets: The mechanic must drain the oil, remove the pan, clean and seal the surfaces, and install a new gasket. This is more labour-intensive.
- Main Seals (Front or Rear): Leaks from the front or rear main seals (which seal the crankshaft) are significant repairs. The rear main seal, in particular, often requires removing the transmission, making it one of the most expensive oil leak repairs due to labour time.
IV. The Importance of Proactive Maintenance
Never postpone fixing an oil leak. A small, seemingly innocent drip can quickly empty your engine of oil, leading to the friction and overheating that cause catastrophic engine failure. Regular visual checks under the bonnet and addressing the issue immediately upon discovery is a simple, proactive way to ensure your vehicle remains reliable, safe, and efficient, safeguarding your significant investment.